Monday 22 August 2016

Slashing and Rhythms


Yet another thought I brought along to discuss with Sian was the idea of slashing.  The ground of my piece is made up of four layers: a piece of dark grey silk, a silver metallic cloth, bronze-grey shot silk and the top layer silk organza.  In stitching narrow parallel lines of varying length and slashing through the three top layers I thought the surface could be further enriched, bringing toning colours and rough texture to it.

1.1 Close-up


1.2 Close-up


1.3  Still Small Voice of Calm


1.4  Left Edge Detail
1.5 Right Edge Detail


Sian talked to me about using a rhythm to apply the cords and this I have tried to do, and with the slashing and later with the application of fine stitching and beads.  Hopefully all the techniques are fully integrated and look right.

Here then are views of the finished piece, though it may be a little premature to say so.


Mounting Resolved Sample

I mounted this resolved sample soon after I completed the piece in August. Sian and I had discussed cropping it at Summer School and as you can see from Image 1:3 in my last post I adopted the idea.
I took a thick and textured piece of rag paper, measuring 55cm x 44cm giving a lovely wide surrounding area to show off the textile piece. I cut two carefully measured slits and positioned the piece along the tacked lines I'd marked when working on it, taking them out afterwards, of course. I then used acid free tape to position it, only at the top so that it is supported: it is exactly the same approach I use with my photographs. As you can see the result gives two horizontal clean edges and two curved and softly layered vertical edges. I think it works.

Cords

So I have confirmed the ideas about the ground for this piece it's time to work out how best to apply the cords and threads.

Before the summer school I had made a selection of fine cords in my colour scheme and in her feedback Sian had suggested grouping them together then applying them, but how to achieve this.

In the back of my mind was  a television programme, part of a series made by Dr. Jago Cooper, exploring ancient civilizations (something I find endlessly fascinating) of South America.  What was appearing through the fog in my mind were knotted cords made by the Inca.  They were arranged in various lengths, knotted along their length and tried to a base cord.  In the image below they almost look as if they might be a collar.  On investigating further the knots turned out to be formed by twisting and knotting the cord in three different ways.

Even more exciting than the look of this artefact was its purpose.  My preferred explanation for its creation was as a story-telling device, a holder of history and memory.  Another explanation is as an abacus or some way of keeping accounts, but that's not really to my taste, though I can see how that idea sprang to mind.

1.1 Inca Quipa Knots
1.2 Forming Quipa Knots


Possibilities and Making Decisions

And what a lots of possibilities there are and so many as a result of Summer School and the opportunity to discuss this work so far with Sian and where I might take it next.

Alone in my workroom the possibilities juggle one with another: if I take this decision, then that may be the result, on and on in a never ending range of combinations.  If you don't actually sample those combinations there is no way of seeing how each one works -- no compare and contrast -- no making a choice of what works best.

When Sian initially told me she thought I wasn't particularly good at making decisions I wasn't completely accepting of the idea.  Now I've had some time to digest the thought, I've decided she may well be right.  So here then is the ebb and flow of sampling and deciding how my resolved sample should look.

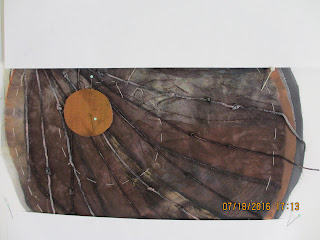
At my tutorial we discussed the smaller complex circle, based on the paper-cuts, and whether it had a place at all as part of the design.  Though the colours of this element were in my colour scheme it did jump out as possibly too strong both in colour and texture: it was made of cotton and felt rather than silk and organza, and unlike those I'd dyed neither of them myself.  (Interestingly having too broad a colour scheme was the same error I made at Summer School with Flint Brocade.)  The way I had tried to integrate the two circles work was by adding fine springs made of cords and clustering beads around them, but it wasn't sufficiently successful to continue along that path.  Instead Sian and I talked about cutting into the main circle to reveal the shot silk beneath; this toned much better, but felt rather an extreme action to take.

My next thought was, if I'm going to cut into my piece of work do I need a minor circle at all?  I did,with just the knotted cords across somehow the piece seemed to lack any purpose, so to me the minor circle was a must.

Orientation was also a discussion point and we decided not only to turn the piece, but also to crop it.


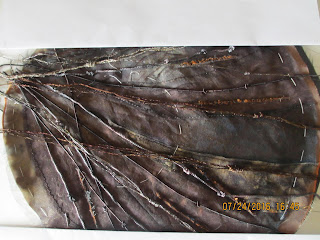
Sample 1: Starting Point

Sample 2 : No circle at all

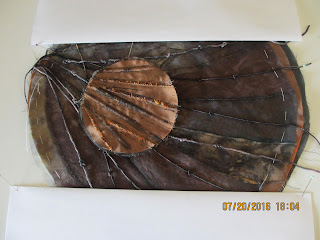
Back home and with so much in a state of flux, I sampled different size minor circles: smaller or even smaller and came to the conclusion that the proportions of the original size were in fact just right.


Sample 3 : Smaller Circle

Sample 4: Smallest Circle

Sample 5 : Just right

  And still resistant to the idea of cutting through the lovely top circle of carefully dyed, printed and pieced organza I began to explore other possible treatments of my perfectly sized circle, trying printing, trapunto, and printing and trapunto combined.  Finally I recreated a circle, like the felt and cotton one but only in shot silk, gradually cutting into it until it needed reconstructing and supporting on another circle resembling by this point a skeleton.  This was  a wholly unnerving experience.


Sample 6 : Printed

Sample 7 : Printing with Trapunto

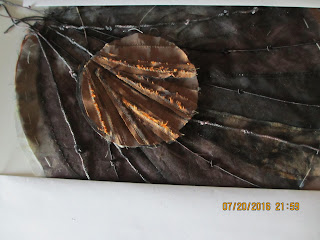
Sample 8 : Deconstructed and Reconstructed