Monday 26 October 2020

Chapter 10: Bindings

 So now for some bound and stitched little books.  So much more measuring and precision needed in achieving a successful result. Making Books by the London Centre for Book Arts has been really helpful and their glue brush something no book maker should be without!

I've tried with this set of books to use as many of my own coloured papers as a can.  This and the papers I have in stock has led to an outside in and inside out approach: the size of what I have to hand determining the size of my book.

So for Sample 1 I wanted to play with the proportions of the book.  It's 5cm wide and 15cm tall, the proportions determined by the rag paper I had.  The cover is Brusho wash over wax resist, which gleams subtly and I find very attractive.  This cover paper, however, was quite poor and the inside would have been unfinished looking so I backed it with another piece from stock which also strengthened the cover.  Cover weight is something I'll return to.  Finally the signatures and cover are stitched with hemp, its colour and character works well, I think.


For Sample 2, again its dimensions determined by the paper I had, I wanted to extend my skills and also address some areas in the previous design, cover weight being one of them.

Books on book making mention weights of paper and card.  The "from what I have to hand" method I'm using does not allow for that even if I had the knowledge.  So a cereal packet it is!  This, of course, needs covering and for this I printed out on cotton one of my paper designs which I also stitched with a variegated machine thread and a further layer of nettle thread.  Rag paper was glued to the back of the cover. ( I have noticed that the PVA tinges the fabric slightly pink.) Finally it was stitched together with jute string, then scored on the outside so that it opens comfortably.


Larger pages seemed to require a stronger cover, however, in covering it with printed cotton, then applying an endpaper it became quite thick.  Add to this more pages which had a tissue wrap round each pair, putting holes through all these layers becomes difficult.  Later this problem is solved by the discovery of a Book Drill.


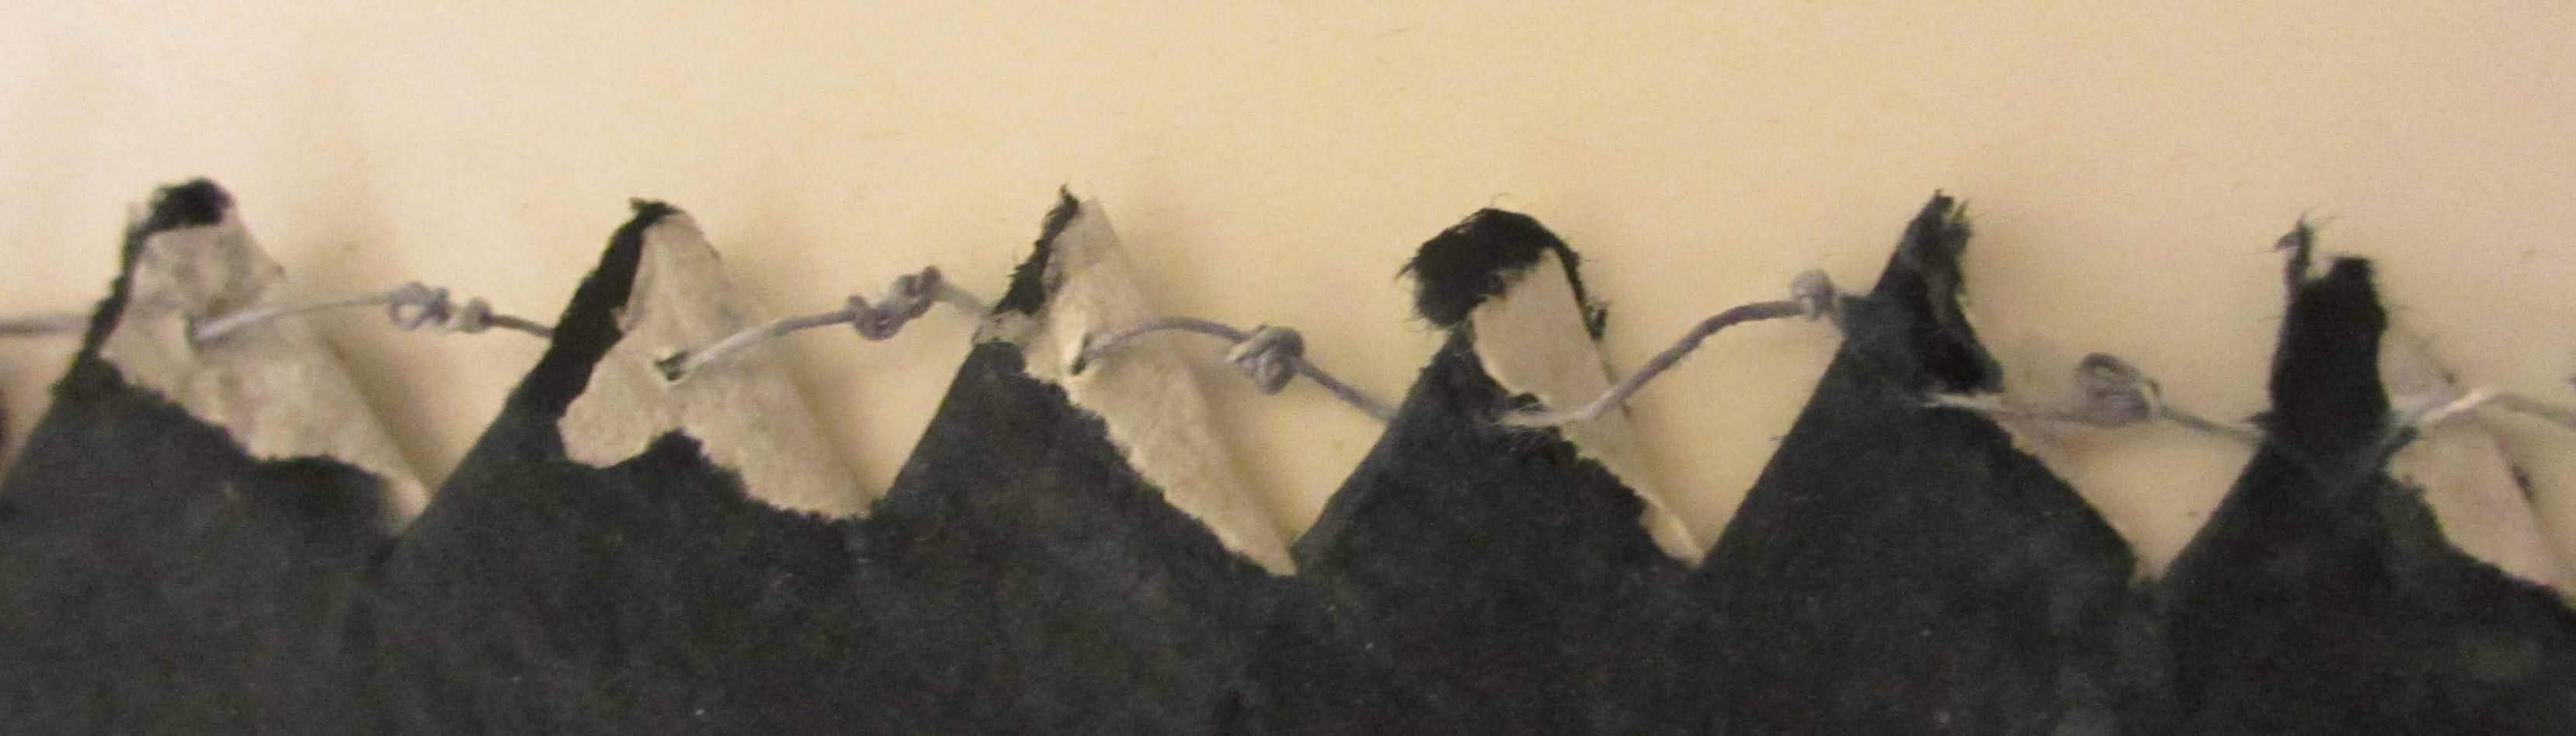
For Sample 3 I wanted to make a closed spine and incorporate decorative stitching as a way of fastening the signatures to the spine.  This will involve piercing quite a number of holes through the narrow spine thus weakening it.  The advice in Cover to Cover by Shereen LaPlantz is to use buckram and fabric for the cover.  Vilene is the nearest thing I have in stock which together with more printed fabric is what I'm proposing to do.


I have already discovered that Vilene is not as easy to handle as I'd imagined: it has a spring of its own having been rolled and I should have pressed it flat before starting out.  Making the corners has also not been quite so straight forward.

The paper I've used for the signatures is Mitsunata Washi, which is 60 grams.  I bought this at West Dean when I was on a course there.  As you can see from the image the paper too was curled.  Even though I've tried to improve matters, both vilene and paper have a memory of their original shape.  A pity as the weight of both paper and cover material seemed ideal for the size of book.

 And why not heap another criticism on the whole thing?  The stitching really isn't significant looking enough.  I've combined the jute string used in Book 1 with a fine orange thread and the nettle thread used again in Book 1. Book spine size determines whether there is enough room for holes; the size of holes determines the thickness of thread and the hole also needs to accommodate double thickness of thread.

A redeeming feature is the use of a piece of old map for the end papers!


And now with a button button stitched on and a bunch of threads threaded through two holes the book works better.


An altogether better result is Sample 4.  The cover is tissue with subtle gold and white rubbings glued to card, thinner that cereal packet card, with PVA (as with all my samples).   The end papers and signatures are rag and fibre paper folded in half giving the same lovely hand made feel achieved in the Boro Book (image 10) in my previous post.  Even though I used the same papers in Sample 1 and 2 above somehow the marriage of colour in paper and cover is just right.  Added to that the spine is open and I used chain stitching with a thick twisted man made thread (viscose?) to complete the book.  Open spines are such a lovely thing: the colour and form of the folded papers is on show and there is further opportunity for stitching and embellishment.  The feel in the hand is soft too.


There were a number of possible pitfalls with this design.  The first is using tissue paper which stretches when in contact with glue.  I was lucky that only the back had a few wrinkles and I did press it well and ensured it was thoroughly dry.

The second difficulty was with the nature of the thread which can twist and loop and behave in a way that makes getting just the right tension tricky.

A great help with this book was the discovery in my tool box of a book drill.  It didn't impact on the tissue and it made holes just the right width for a needle and its double thickness of thread to go through.  And I won't be able to tell until I try how effective it might be with my own handmade papers.


Now for Sample 5 which is a response to the idea I put forward at the end of Chapter 9 in Thoughts on Book Making.  This is 11cm x8cm and uses thin computer paper marked with a wax candle and Brusho-ed over. Groups of high quality scraps of computer paper are cut in different widths.  The end of the top page of each section are decorated using ideas from the Edges Chapter.  Holes are punched on the spine of the book at close intervals and threaded through with dyed textured wool.  Sadly this doesn't allow for the loveliness of an open spine which I commented on in Sample 4.


I know the computer paper is all wrong -- too white, too smooth, too thin. The book needs the lovely Khadi paper I've used in a number of the examples above, but I was reluctant to start cutting paper into exact sizes before I was sure of the design.  I may well be able to make papers of the right size and so get the beautiful deckled edges all round.  Tearing is possible, but the effect just isn't the same.  Also with the right kind of paper the final stitched section might work as the contrast between stitching and paper would be less pronounced.  Another solution could be a soft wash of blue which is then stitched in to.  On the whole though if doubled in size it has the potential to be a characterful piece.

Friday 25 September 2020

Chapter 10: A Review of Book-type Structures

 Quite a considerable time ago I started making some book-type structures using whatever was to hand.  Initially these were simply folded. They all had soft covers which were made from carrier bags, paper wrappers and the like, the pages inside computer paper.  As time went on glueing and stitching became part of my repertoire and I searched out other papers for the pages.  Making these books gave me the opportunity to play with a range of materials and simple techniques.

Origami books: above (1) two trials with computer paper printed with my own photographs.

Below an origami book (2-6) using a Jigsaw carrier bag.  The design appealed and tempted me to add words on translucent paper -- sadly the paper strips didn't adhere too well.


Below a Snake Book (7) made from brusho painted computer paper over wax resist, finished with stamped words.  Each tiny page is wired to its neighbour.


The Fishtail (8) using Japanese paper glued to a scrap of something for the cover.  All materials were too soft.


A Concertina Book (9): beautiful Florentine marbled paper glued to thin card.  The brown paper pages were chosen for their colour, but they are soft and floppy when compared with the cover.  Superficially it looks good, but . . . 


Mood meets form and form function (10 and 11).  Below I've used handmade paper, coloured and stitched.  A strip of the paper binds the book.  It's then threaded through with dyed sari silk.  I feel this is really successful: the content, feel and look of the cover and pages are in perfect harmony.


Stitched Postcard Book (12 and 13): making straight folds in the thick card was probably the most difficult aspect of making this book.  Stitching for the same reason was troublesome.


Simple Stitched Book with One Signature (14):  here the cover is made with painted vilene, the pages of dyed lining paper.  The weights of both are a good match though I feel the vilene is overly heavy for its function and it lacks that special feel in the hand, so important given the book's contents (war poetry).


Wrap Cover (15 and 16): how lovely it is when things arrive through the post demanding something be done with them, they're far too good to throw away.  The cover below was a magazine wrapper.  The circular motif I cut from another part of it glueing on a piece of raffia by way of a tie.  Inside is light Japanese paper which compliments the cover well.


Dos-a-dos (back-to-back) pamphlet, (17): weigh and crispness of cover and pages are balanced.  A very handy design, though the squarish format is unusual.


Kantha Book (18 and 19) in stitch only: I included this because it made me consider more fully the feel of books in the hand.  Here not only has the stitching mellowed and integrated the colours, but working the fabric has softened it too.


Finally, Embroidered Book (20 and 21)using fabric from Module 3 stiffened with vilene and with fabric pages, an Ann Wood pattern.


There's so much learning in writing up this set of samples that I must note things down while things are clear in my mind.
  • The type of paper dictated the success of the fold: too soft and definition is lost, too thick the fold might not be straight.  Too thick paper can also create stitching problems.
  • Follow the grain, if possible, when folding -- grain parallel with the spine.
  • The weight of cover and pages must be sympathetic.
  • The feel of a book in the hand is very important.
  • Nothing should be disregarded as bookmaking material.
  • Consider stitch as a way of enhancing both the look and feel of paper and cover.


Friday 18 September 2020

Chapter 9 : Stitched Edges

 At the end of Chapter 8 I took everything off my display board and made a new assembly of the samples that please me most and the stepping stones that led to their making.  At the top I have a phrase "Mood meets form".  I'm not sure where I found it or who coined it but the words seem to be good to hold in my mind as I work through Chapter 9.


So here are the factors I took into consideration:

  • what will the subject of the book be?
  • will the stitching be round the cover or individual pages and on all sides or some?
  • what about corners?
  • the weight of the paper will be significant and might work better with some ideas not others
  • the colours and materials used will need to complement the subject matter
  • when does an edge become a border?
  • have I the tools I need -- single hole punch, stiletto, pliers as well as needles and sewing machine?
Once started the ideas flowed and seemed to group themselves under a number of headings:

Manipulating

1.Rolled and machine stitched
2.Torn, folded, strung and knotted


Applying

3.Torn pieces, inked edges, fly stitched
4.Pleated torn strips with coloured pulp and cross stitch


Beaded and Looped

5.Wired on bugle beads

6.Looped on seed beads

7.Cord looped in two direct


Knots

8. Tape
9. Tufts of withdrawn threads
10.Small knots, piercing and ink edge


Stitched Writing

11.Paper String
12.Thicks and Thins
13.Thicks and Thins scaled up
14.Scrafitto and Stitching
15.Wax Resist and Stitching
16.Machine Stitched Zigzags
17.Machine Stitched Lines


Examples of Combinations

18. Lines and Zigzags
19, Loops and Wax Resist


Thoughts on Book Making

I think all of the edges above have writerly rhythms and it was really interesting to try out so many different materials and techniques.  Some of the paper is my own, but I've also used some Khadi Paper 150gsm.

My favourite of all the edges  is 18, the combination of two machine stitched samples.  Compared with many of the samples it is fairly flat and as an edge to a book page would work well.  Others are thicker and would rely on spacers within the book if they are not to be crushed.  However.  the book design could have decorative edges only along the page side opposite the spine.  These could also be of increasing width so that they stick out beyond the book cover.  As each page is turned the combination of edges is reduced.

A further consideration of this idea is the reverse of each stitched edge.  This could be tidied up under strips all decorated in the same way with, for example, the wax resist sample without any stitching.


Thursday 27 August 2020

Chapter 8 : Final Experiments

 So here are the final few experiments where I've stitched into paper using the research on lettering to inspire me.

4:8:20


4:8:21


First of all a loose grid with paper pulp filling some of the holes, others open and ready to have the lovely space dyed flat paper yarn looped through them.  I added a looping machine stitched border with space-dyed machine thread.  Trialling ideas is now something I frequently do.  In this piece I made some sample border strips and tried them against the original, not going ahead until I was sure.

Secondly, a rather wiggly grid embedded in paper pulp and with a border.  This detail shows repetitive hand stitching in a blue/brown floss with lots of spring.  These markings are in response to the calligraphy image 4:1:29.  I didn't pursue this idea, although I do like the lines of markings which are lovely and rhythmic.


4:8:22


4:8:23


The final piece shows free machining along embedded threads responding again to the calligraphy examples from my research.  You can see where the paper is thin and the pull of the machine stitching reveals the muslin underneath.

Final Thoughts:

Handmade paper is a very lovely surface on which to stitch.  The stitching does need careful planning because the surface can be fragile, though, as I've discovered it is possible to correct the position of a individual stitch and the hole heals over.  Surprisingly it is strong enough, if attached to a piece of muslin with repositionable adhesive, to stitch quite densely both with hand and machine stitch. 

The other thing I'd like to comment on at the end of this chapter is how good it is to have to hand other  module materials, but even more my own sketchbooks.  They are a great source of how to achieve things as well as inspiration.  Module 2's work is especially like this and because most of the work was flat instructions and samples are stored together and I was especially diligent about taking notes.  I wish I'd been able to work out a better solution for Module 3 where the work was largely 3D; this module will have similar issues.