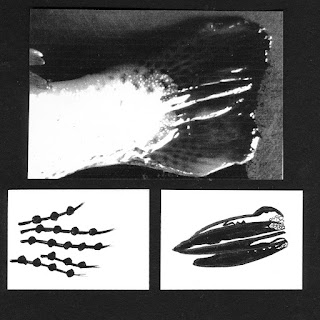
A range of black and white images of fish -- herring, mackerel and rainbow trout -- with decorative markings.
Linear drawings to help observe and understand the markings.
See also Fish Shop Inspirations.
Wednesday, 14 March 2012
Machine Stitched Strips
Just two strips so far though I have some ideas for others. I decided to follow these up as I study and work on the patterns on my fish.
Cable and Whip Stitch
Loosening the tension created some really interesting effects, both delicate and dramatic. I liked the fact that both sides of the fabric might have exciting results. The three samples below have a lightness and sense of direction that I find particularly attractive.
1) Zigzag stitch producing lovely wavy raised effect.
2) Straight stitch with white in top spool.
3) Zigzag variant trimmed with scissors to give a lighter look, however less stable.
The next four samples used Oliver Twists Spun Silk 30/2 20g in variegated brown/black. The range of tonal quality is still there but the stitching is more definite.
4) Darning stitch with feed dogs down.
5) White thread on top, varying zigzag size and degree of overlap.
6) Reverse of Sample 5.
7) White thread on top, varying size of zigzag from corner.
Tuesday, 13 March 2012
Zigzag and Decorative Stitch Experiments
9) Zigzag lines stitched from corner in varying lengths, smallest setting creating random dark patches.
10) Zigzag variant increasing stitch length applied more freely diagonally across the square.
11) As above, but less densely applied.
12) Decorative stitch varying length and as a result lines are closer together.
On a purely practical note the dense stitching on sample 12 was least successful: the fabric is scrumpled up and frayed so it has not been possible to layer the stitching as much as hoped for. If I used this idea I'd make a larger sample and cut out the required amount.
Sample 10 achieves layers of stitch, contrasts in zig-zag length and small blocks of dark stitching.
Sample 9, though very simple in execution, manages to achieve patches of darker and lighter fabric reminiscent of the 3D effect of ripples on water.
ZigZag Stitch
4) Zigzag length and distance between row increasing.
5) Stitch length 3, zig-zag 5, distance between rows decreasing and overlapping with increasing density
towards one corner.
6) Zigzag length 3 and gradually reducing stitch length and closeness of rows towards one corner.
7) Zigzag variant looping over the square randomly and with increasing density towards one corner.
8) Stitch as above, starting small and increasing in length applied in lines.
This series of samples are more expressive than the straight-stitched ones, especially samples 7 and 8. I like 7 particularly with its multi-layered threads criss crossing each other and giving depth. The tension is incorrect in sample 8 and even though Stitch and Tear has been used the sample is puckered where the square is most densely stitched. The sample's appeal lies in its mark making quality and its lack of regularity.
Straight Stitch
Straight stitch variants worked with machine thread on medium weight calico supported by Stitch and Tear:
1) Varying length of stitch and distance between lines.
2) Stitch length size 3. elongated triangles creating density in one corner.
3) As above, but using rectangles.
Chapter 3 : My Bernina Artista 630
Although I've had my machine for a few years now, and did the Bernina training day which demonstrated the scope of the machine, I've only carried out straightforward sewing jobs with it, apart that is from a days free machining with a tutor.
My first attempts to show tonal effects were a bit disappointing and therefore I decided to make myself a reference sample of all the decorative and practical stitches available. It was a really useful thing to do; it not only enabled me to compare the variety of stitches with those in the module but improved my confidence with the controls.
Saturday, 10 March 2012
Catching Up
Subscribe to:
Comments (Atom)


