
Sunday, 12 February 2017

Health and Safety Rules Observed

Additional Note:
The neck-piece has been made using some hematite beads. These are not suitable for anyone with a pace-maker to wear and the neck-piece needs to be labeled with this warning.

Friday, 10 February 2017
Giacometti
I have always enjoyed looking at Giacometti's post war work; the elongated spare sculptures cast in bronze, figures reduced to their barest minimum, hardly existing at all.
After I'd visited "A Line Through Time" at Sainsbury Centre in Norwich, where I was able to admire Giacometti's works at close quarters (and saw work by his contemporaries), I felt compelled to find out more about him. I read James Lord's biography and this put Giacometti's life into context and helped me understand what were the forces which evoked such a strong emotional response.
Giacometti was born in 1901 in the Bregaglia Valley on the Swiss Italian border. "It is a region of precipitous slopes, jagged peaks, icy streams, high meadows, and simple villages. Beautiful but austere." From early November till mid-February, the sheer mountain walls cut off all sunlight, and the coldest time of day or night is high noon. Surely such surroundings would influence anyone living there, especially the children of an artist. Of the four children born to Giovanni and Annetta Giacometti, Alberto, Bruno and Diego, became artists. Family bonds were strong and throughout his life Alberto returned annually to his home.
 |
| Self Portrait |
 |
| Giacometi's Drawing Technique |
Giacometti experimented with Cubism and Surrealism in forms influenced by primitive art, psychoanalytic theory and toys. After the war he broke with Surrealism and began to revise his view of sculpture working on the very elongated and seemingly withered forms that touch me most. They are his own unique view of reality where everyone is" thin as the blade of a knife"; they are a metaphor for the post war experience of doubt and alienation. Their heavily worked surfaces are rough and eroded, nothing is superfluous. Their bronze patina seems to speak for all time. They evoke a haunting and ethereal atmosphere. In their creation Giacometti became linked to the work of Jean-Paul Sartre and existentialism.
As with his drawings, Giacometti felt his sculptures were never finished, beginning each sitting with a complete reworking, which he claimed could go on for ever. "His work is an intense record of the ever-changing living presence of his subjects."
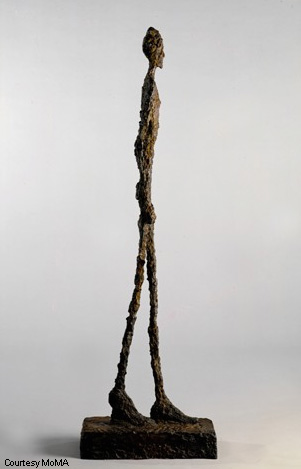 |
| Walking Man 1960 |
 |
| Alberto Giacometti |
"All I can do will only ever be a faint image of what I see and my success will always be less than my failure or perhaps equal to the failure."
Thursday, 9 February 2017
Evaluation
It seems to me that evaluating a resolved sample is a delicate matter, given the investment of time, effort and emotion. Between the concept and the finished article lie a succession of small decisions, some of which reveal another problem to be resolved. Of course that is the pleasure as well as the frustration of being creative.
Writing an evaluation also reveals growing confidence and sure-footedness in shaping materials to an idea. And that is where I want to start: I certainly feel that in this task I have been able to realise the image I had in my mind, that my skills and the materials I've chosen are a match for the task. Such a relief too to have escaped the endless looping round of sample making and feeling that I can't move on.
How do you feel about the resulting conclusion?
As I've alluded to above, I really am delighted with the neck-piece. It helped to have a really clear idea: I wanted to make a neck -piece that was industrial looking and in a narrow colour range. Working with Tyvek, a new material to me, was challenging and interesting especially controlling the length and width of each bead, to say nothing of the textural effects which were often unpredictable.
Having an idea and realising it are two different things and I was fortunate to find an interesting range of beads to use as spacers; finding the hematite ones opened up my mind to other possibilities and the larger milled glass beads were the happiest of accidents. I decided not to change the component parts of the cord as I felt it was the best combination of threads and wire. Learning from early mistakes I adjusted the way I threaded the beads and had less problems.
Is it fit for purpose?
Yes, and for a number of reasons. Firstly it's light, and surprisingly so given its look, so it will be comfortable to wear. Secondly, its length is ideal to be seen in a low neckline or within a collar. Thirdly the fastening is secure, simple and easy to use.
If you were asked to make it again, what changes would you make to the way it's designed and the way you made it?
I think the idea has potential. I could see it translating into pendants of varying lengths with between one and three Tyvek beads, possibly with the inclusion of some metal pieces. The Tyvek beads could be of a more exaggerated length, for instance between 10cm and 12cm. Earrings are another possibility, dangling ones using bronze or red-gold findings, or even round shaped beads as studs. A final idea, and one I suggested on my blog when I originally made the card mock-ups (see the Composite sheet), is a brooch or corsage-style piece of jewellery. This would be mounted on a pin and suitable for wearing on a dress or jacket lapel.
Thinking only about this neck-piece, I would experiment further with the Tyvek and heat gun to improve the profile of each bead and ensure that there was a place for making a threading hole at the correct point (approximately a centimetre in from the top). I would also experiment further with using threads and printed words, though the use of these might be more meaningful in the pendant and brooch versions. The bead fastening could also be made from Tyvek or a small version of the soldering iron samples in Chapter 7. Thinking about the colour of the neck piece as a whole, I wonder whether it's possible to achieve greater intensity of colour with Tyvek? Maybe some matte paint under the metallic would help.
The constituents of the cord caused most problems. If I leave out the hematite beads with their narrow holes the problem of the metallic thread component disappears. Alternatively I could opt for chunkier spacers and make a slightly more substantial cord, including the metallic thread and possibly a thicker beading wire, as the finer beading wire has also been vulnerable to breaking. A thicker cord would probably be most appropriate with the pendant version. Each decision is a balance between practicalities and aesthetics.

Sunday, 5 February 2017
Completion
Well, I've had my neck piece feedback and now it's time to complete it, which I'm really keen to do.
The final dilemma concerned threading the hematite beads on to the cord which caused the it to break. I inquired about the holes being made bigger and tried myself with a gimlet, but the stone is far too hard and the idea not recommended. I do like the hematite beads and really want to use them, though I recognise their limitations: their scale is possibly a little too small and maybe they are almost too close in colour and texture.
So what did I decide to do? I've taken the whole thing apart, made several lengths of cord in case of disasters and decided to include some milled old bronze-brown glass beads as additional spacers. I've placed these where I had used the circular Tyvek beads in one of my trials. They add another layer of texture which emphasises the industrial look I wanted to achieve. They also allow the long Tyvek beads to splay out, as shown in the neckline of the evening jacket photographed below. I think the combination works well. The neck piece fastens with a further milled glass bead and a loop.
Bead and Loop Fastening:
I threaded 10cm of the cord through a milled glass bead and twisted it five times. I looped the cord in two and twisted it along its length. To disguise the end I then spiralled the twisted cord in the direction of the bead. The attachment is neat, secure and strong. The loop is made in a similar fashion.
The final dilemma concerned threading the hematite beads on to the cord which caused the it to break. I inquired about the holes being made bigger and tried myself with a gimlet, but the stone is far too hard and the idea not recommended. I do like the hematite beads and really want to use them, though I recognise their limitations: their scale is possibly a little too small and maybe they are almost too close in colour and texture.
So what did I decide to do? I've taken the whole thing apart, made several lengths of cord in case of disasters and decided to include some milled old bronze-brown glass beads as additional spacers. I've placed these where I had used the circular Tyvek beads in one of my trials. They add another layer of texture which emphasises the industrial look I wanted to achieve. They also allow the long Tyvek beads to splay out, as shown in the neckline of the evening jacket photographed below. I think the combination works well. The neck piece fastens with a further milled glass bead and a loop.
 |
| !0:10 |
I threaded 10cm of the cord through a milled glass bead and twisted it five times. I looped the cord in two and twisted it along its length. To disguise the end I then spiralled the twisted cord in the direction of the bead. The attachment is neat, secure and strong. The loop is made in a similar fashion.
 |
| 10:11 |
 |
| 10:12 |
Subscribe to:
Posts (Atom)
