Friday 15 April 2022

Chapter 5 : Wadded, Shaped and Padded : Corded Quilting


 Having spent very regular time in my field throughout the last year I've had ample time to look at branches, stems and stalks: the straight and stiff their surfaces reeded, like docks.

Other growth  may be curved or arcing studded with thorns or a covering of hairiness.  Then there are branches: thick, branching with the roughness of many year's pruning.

Softer is the long sinuous growth that wraps round everything it meets.  And later in the spring there are dandelion stems, soft tubular affairs.

I'm drawing these things to mind because any cords I use in the future may well need to have this range . . . Firstly, a sort through my Module 3 cords to see what might work..


I'd say I've really just played with the idea in this final section.  Sample 5:21 shows curved quite substantial cords stitched into cotton organdie using zigzag stitch.  Though I played with the stitch tension the results hardly show the cord, which is what I'd hoped to achieve, though it's interesting to see the tucks and slight pleats created by the curved cord.


5:21

In Sample 5:22 silk net is wrapped around a cord, herringbone stitch is used to secure it.  The stitch has become looped and the thread is rather too thick for my liking. It looks heavy handed.


5:22


Sample 5:23 is more successful.  It uses the same net and cord, but this time the net is loosely gathered around the cord and stitched in place with white.  I added zigzag stitching by hand with a toning space dyed thread; it seemed to need it.  I like this sample very much.  It has a quality of a leaf skeleton about it.  It's really interesting to see the way in which crumpled silk net can support the weight of the cords.


5:23

For Sample 5:24 I'm back on the sewing machine trying out a twin needle and playing with stitch length and tension.  The results are random and beautifully unexpected.  These are yet more old stock cords on smooth cotton organdie.

In Sample 5:25 a very different combination with a different effect: this time twisted space-dyed sari silk on toweling.  I'm working on the back of both samples, so each time the result is a surprise. I twist the sari silk as it goes through the machine. It's not as hard as cord and because the toweling has a pile the sari silk ceases to have a clear edge and becomes embedded. Some escapes the stitching entirely, which is pleasing too. On either side are twin stitching directly onto the toweling, another attractive effect.
I had hoped to use some of my lovely space-dyed silk threads but for the machine to accommodate these I need to tweak the tension further.


5:24


5:25

These two ideas in combination might create an interesting surface.

5:26

And here in 5:26 a little more experimenting.  The colours are a little bolder: I'm using what I have in stock and I've managed to solve the tension problem. I was also able to include other twin-stitched thread and try overlaying several rows of stitching.  My preference is the more subtle 5:25 which I think is less about pattern, more about mood.  If I use this technique in the future I need to buy some King Tut in neutral shades. Interestingly the density of stitching stiffens the piece and makes it almost free standing.

Then finally, a technique I found in "Machine Embroidery Stitch Techniques" by Valerie Campbell-Harding and Pamela Watts.  It just appealed, though again the threads might  benefit from being more subtle.  Rows of multi-thread linen are zigzagged down on very thick linen in short runs.  The gaps between are cut and the multi-threads partially separated creating splayed tufts.  5:28 is the reverse of this piece.


5:27

5:28


Tuesday 5 April 2022

Chapter 5 : Quilting, Padding and Stuffing -- Padded Quilting

When I read the instructions for padded quilting I imagined there would be great potential in the technique: I thought I'd be able to realise some lovely effects, translating a whole variety of plant shapes and surfaces. I've been disappointed by my results. My machine tension (how I do agree with those posting on facebook who fear getting their machine out), the tools for drawing designs on fabric and stuffing techniques, all of these are factors.  Then I pressed my work on the reverse and I have wrinkles spoiling it.  Oh the disappointment; oh the time taken.


 Dandelion is first in this set, with calico on top and scrim beneath.  I used a pencil used to mark out the design, a poor choice as the marks remained. The shape is complex with points and narrow areas and I tried both cotton wool and polyester fibre fill as padding.  Pointed scissors were best for moving the padding through.  The scrim side could also be used on top with random stitches to draw the slits together.

5:14

The following four samples feature docks, lovely straight stems with branches sprinkled with seeds.  I used yarn, some thick, some thin to pad the stems with fibre fill for the seed heads.

I've achieved some delicacy in the drawing of docks, which improved as I practised: 5:15 and 5:16 are freehand machining with no initial drawing. The seedheads, however, are too bulbous.  I used lawn on top and scrim below and, a confession, no frame which explains the seedheads.


5:15

5:16 has cotton organdie above and fine wool below.  I have better control over the machine, but the seedheads this time are too small to pad.


5:16

For 5:17 I used an Adger Chako Ace Pen, which only partially faded on the cotton lawn. The bottom layer is muslin. 5:18 is again freehand and probably the most successful outline, with the dock stems and seedheads in proportion..


5:17 and 5:18


Now for different subject matter: for 5:19 I used a tracing of one of my charcoal hedge drawings.  Whilst the drawing has potential I'm not sure whether the technique is appropriate. Silk organdie is the top layer, with muslin beneath. The machine stitching is poor, a mismatch in top and bottom threads -- in summary, more practise needed.


5:19


And here below a second,  I've taken another hedge drawing, this time scaling it up to give slightly wider branches.  I've used silk noile in top with muslin beneath.
Machine tension is now correct and I free-machined the outline.  The work was in a frame, as it was for the photograph.  I'm still not happy with the result as the fabric is rippled round the shapes leaving them indistinct.  My conclusion remains that this technique is not a match for the subject matter!


5:20

Sunday 3 April 2022

Chapter 5: Quilting, Padding and Stuffing -- Shaped Quilting

 Below are a series of shaped quilting samples, using a variety of fabrics (top and bottom), padding materials and stitches to hold the padding in place.


5:10
Calico, scrim, docks from my field and seed stitching.

Above is my favourite of these four samples.  I like the translucency of the scrim and the way its tone is deepened by the stitching.  Although the stitching is neutral I can see how further interest could be developed by using colours toning with the dock stalks, especially if the thread is space-dyed.


5:11
Calico, muslin, long slices of compostable 
                                                            packaging and blanket stitch.

Possibly the least successful of the four samples, although the blanket stitching does imitate the way grass and weeds grow around any rock, stone or other random item left in the field.


5:12
Calico, viscose, short slices of compostable
packaging and running stitch..

In this sample the background running stitch circles echo the circles of packaging and imitate the clusters of mushrooms which pop up after rainy weather.


5:13
                                                        Wool, velvet, wire and stem stitch.

The garden wire creates some interesting undulations in the surface and the pile within the stitched shapes has taken on a different tone.  I've also used three different threads resulting in other small differences eg how the light is caught and whether the thread and velvet merge together.


Chapter 5 : Quilting, Padding and Stuffing -- Wadded Quilting

 Wadded Quilting 

 So these first three samples are by way of "getting my eye in".  I've based the designs inevitably on my field.

The first uses a calico backing, lawn to and  man-made padding, with running stitch to quilt the layers.  It's very straight forward and effective.


5:1


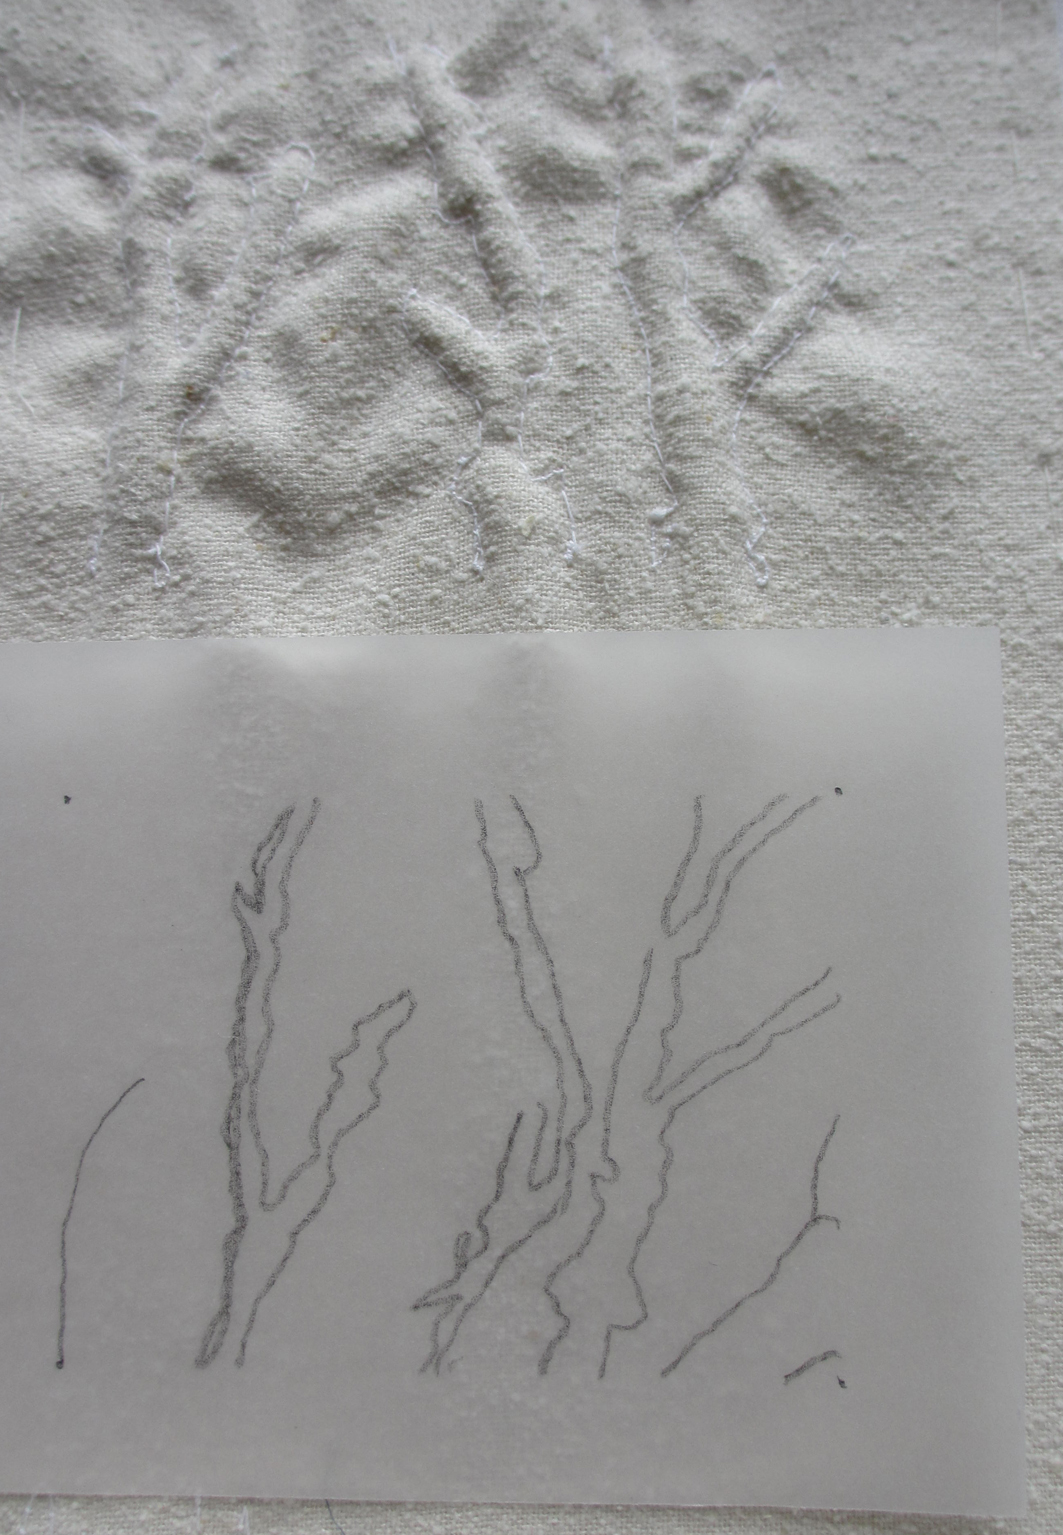
The two images below show both sides of a quilting sandwich which uses scoured cotton and  scrim with the same man-made padding.  The running stitch shows the tree outline clearly on the scoured scrim, less so on the scrim where the stitching has pulled through the very lose weave.


5:2

5:3


Now for some more adventurous combinations:

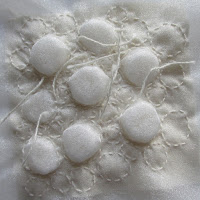
Firstly, two versions using calico and netting with paper shreddings in between.

In 5:4 I used double lines of running stitch, which were very challenging to achieve and no where near as effective as the fly stitch on 5:5.  One point of difference between the two samples was the more careful sorting of the coloured shreddings.  Secondly, fly stitch seems a much better echo of the jumbled small strips of paper, though the sheen on the thread maybe works less well.  Net  really is an ideal fabric for showcasing both stitch and stuffing.


5:4

5:5


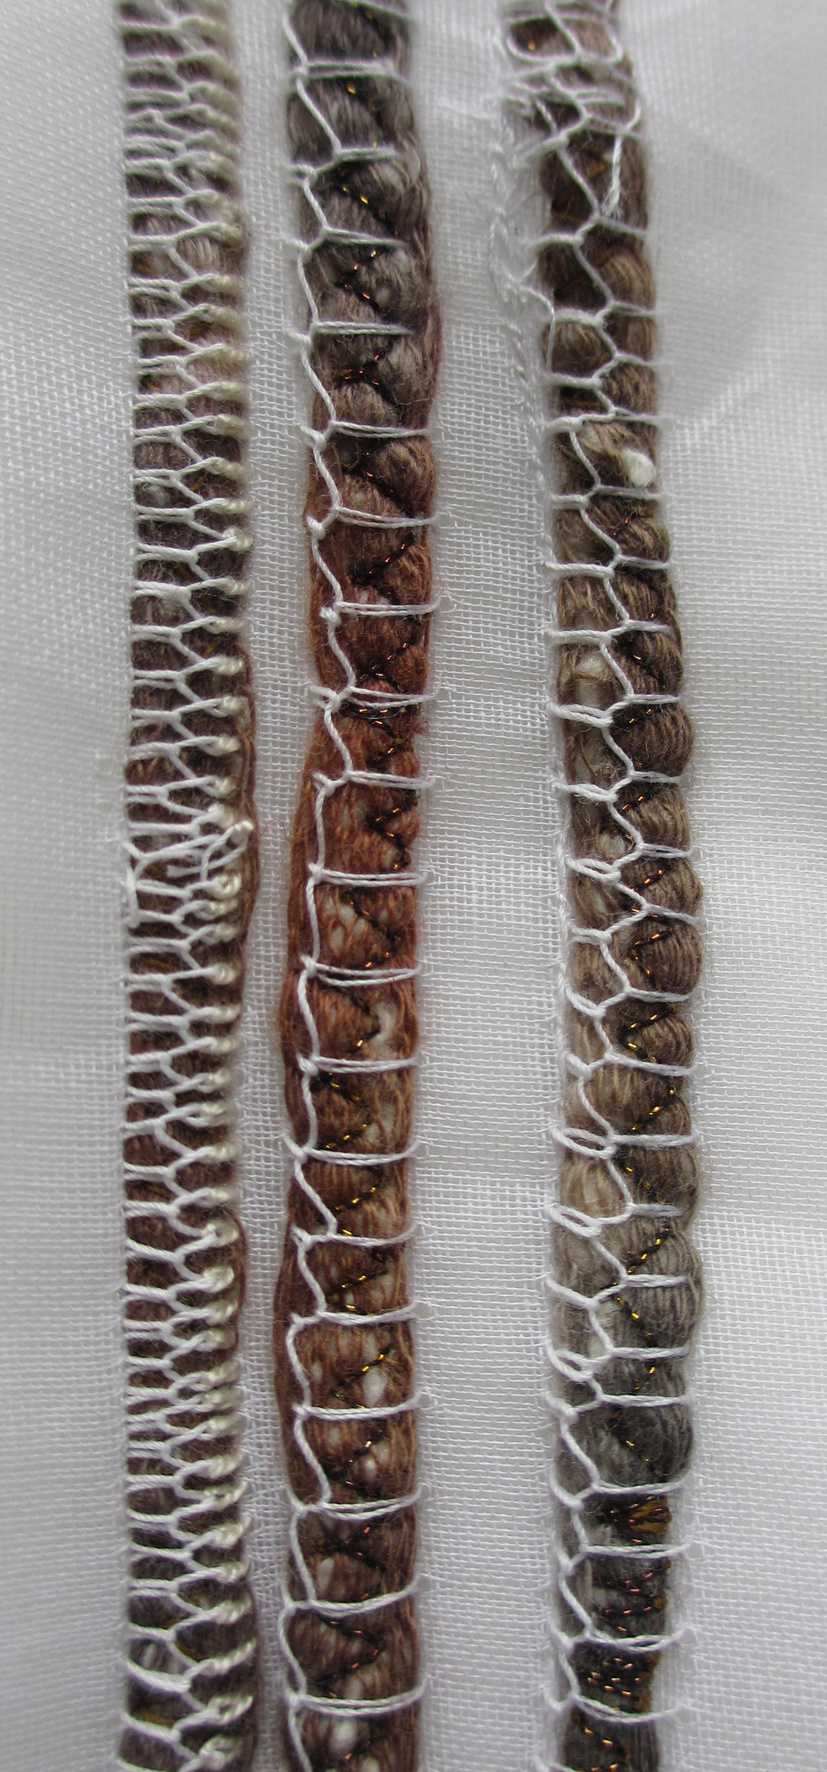
The next sample shows the same fabric combination, but with elongated curls of wood shavings.  Large, irregularly sized cross stitches in a wiry jute are used to hold the sandwich together.  A thicker fibre thread might be more obvious, but I do like the way it's visible at one moment, disappearing between the curves of the shavings the next.


5:6

5:7

In the second version jute knots have been used to secure the layers.  Again, the string used to tie the layers doesn't make the knots fully visible: the string's too thin and its tone too close to that of the shavings.  It's a question of finding something that will fit through a needle.  A solution for thicker string would be to use an empty needle to make a hole and push the string through -- fine for making knots, but not for an embroidery stitch.

Thinking about the hedgerow I've been studying, so much in nature has tones that are very similar, so maybe I'm being over critical. 


And next, calico, two-way stretch fabric (white tights) and wood shreddings ( another challenging padding) with lines of fly stitch.

What is particularly interesting about combining the two fabrics is that by pulling the stretch fabric quite tightly a curve can be created. I can see how interesting this can be, especially if a number of such pieces are attached to each other.


5:8

Then finally in this group 5:8, a calico, scrim and sawdust combination with lines of double crosses.

This really was a very impractical combination with the sawdust escaping its sandwich and failing to remain in place once stitched.  However, I do like that impression of something newly excavated!


5:9


Friday 1 April 2022

Weaving, Printing and Stitching

 Back in August, in a post called Even Deeper Rabbit Holes (final image), I made a  narrow weaving to express how I saw my field in summer.  The image immediately below is a follow-up piece, showing the field in autumn.  I'm really thrilled with the way it conveys the changes at that time of year: its raggedness, its faded colours and the few seed heads that cling.  The piece itself is deliberately narrower than the summer version and the plans I have winter version are narrower still.


Field Gazing: Autumn


Field Gazing: Winter


I've been assembling this set of blogs over such a long period that here in fact, is the winter version. Narrower still than the autumn version, over just five warps. The range of yarns and threads and strings are complemented by cellophane, newsprint and opaque plastic and a very few beads to mimic raindrops.  I had to wait for weeks to take an image of the field affected by frost.

My little loom is warped and ready for the spring version, using a photograph from the early days of my year of visiting and looking . . .


*     *     *


Some weeks ago Gwen Hedley, through TextileArtist.org, offered a five day Stitch Camp which I joined, albeit a day or so late.  Below is my final piece.  I very much enjoyed melding the cut pieces and hiding the overlaps with stitch and applique. I completed the stitching with a range of different sized circles which overlap and extend beyond the patched strip onto a piece of calico.  The whole piece is stretched over a board.


Celestial Bodies


*     *     *

Late to the party for a second time, I joined Sian Martin's Stitch Challenge 2022 and I'm so glad I did.  The first four tiny samples are below.  It's such a thought provoking and engrossing thing to do and especially lovely as I can use my field photos yet again: I feel I'm getting twice the value, more close observation and more learning about what works in terms of needle, thickness of thread and size of stitch, and yet more engagement with colour.


Ground, Docks, Hedgerow and Frost on the Ground
(clockwise from top left)

Instead of using luggage labels for the samples,  I've decided to put them in a little spiral bound book together with photographs and comments as a reference for further work.


*     *     *


Most recently, in March, I went along to a day's workshop at Norfolk Wildlife Trust in Cley to attend a workshop run by Nicola Coe called Making Tools with Natural Foraged Finds.  We had a lovely walk, the weather kind, and bought back reeds, twigs, feathers, seaweed, bits of sponge and so on and, back in the studio, created tools to make marks with ink.

The next time I visited my field  I foraged for heads and handles and made the set below.  I'm hoping mark-making at home will be a much less self-conscious affair, having, as I do, the many field shapes and rhythms already in my mind and hand.


Foraged Tools, Heads fastened to Shafts 
with Linen Yarn and Glue


Mark Markers with Incorporated Handles