Wednesday, 18 May 2016

Chapter 7: Simple Button Making

This collection of buttons has been waiting on my desk ready to photograph and write about. During that time I've continued collecting threads and beads excited by their colour, texture and potential.  Worse than that the books on my self are full of post-it notes, to say nothing about the browsing and borrowing of library books.  What did Victoria Wood sing, "Just do it!"

So here then is my button collection using fabric, threads and beads in my ice-blue, rich brown and greys colour scheme.

Wrapped Cores, starting from twelve o'clock:

1.  Round core covered with self-dyed  cotton,with gold rub on spiral enhanced with beading.
2.  Round core covered on matte silk gathered in several small spirals topped with small gold sequins.
3.  Rectangular core covered with silk and enhanced with threads and bits, then wrapped with beaded       threads.
4.  Padded wrapped rectangular core wrapped in chiffon and beaded threads.
5.  More obviously wrapped rectangular core (parcel-like), using bought patterned hand-dyed fabric         and wrapped with beads and small sequins.
6. Round core covered in chiffon and decorated on the top with a hand-dyed chiffon strip gathered to     create a flower the centre studded with tiny springs, beads and sequins


Buttons using wrapped cores
  Toggle Buttons, from left to right:

7.  Layered and different width fabric (cotton and silk) rolled round cylindrical core and tied with            faux leather strip.
8.  Another cylindrical core wrapped in cotton enhanced with threads and bits, then decorated with          band of velvet which has been beaded.
9.  Layers of corrugated card covered with cut thread stretching beyond the core.  This was then              wrapped with a gathered and beaded strip of chiffon -- utterly impractical as a button, as many of        these ideas are.


More buttons using wrapped cores

Dorset Buttons, starting from nine o'clock

10.  Metal ring wrapped in soft silk floss.
11.Double card ring wrapped randomly with soft silk floss and strips of blue nylon knotted at                  intervals.
12.Metal ring wrapped in multi thread cords, leaving the centre free.
13.Metal ring wrapped in multi thread cord filling the centre.
14.Medium size ring wrapped in hand dyed sari silk the ring then parcelled round in fine irridescent        thread.
15.Double card ring solidly wrapped in a silk strip and enhanced with beaded thread.


Dorset buttons

Domed Buttons:

Domed buttons

Four samples showing a combination of felt and thin copper sheet then machine using spirals or zigzag to distort the shape.  Further distortion created by applying pressure in a circular motion to the copper.


Tyvek Toggle Buttons:

I haven't used Tyvek before so I carried out a little bit of research including watching Carolyn Saxby's blog which was very helpful.

 I had a Gwen Hedley pack languishing in my cupboard already cut into A4 pieces.  I painted both weights of the Tyvek on each side using acrylic paint in my colour scheme. I also sent for some Lumiere light body metallic acrylic in old brass, metallic rust and pewter which I'm hoping to use at some stage.  The instructions about using Tyvek given by Carolyn Saxby on her blog were very helpful.


Painted Tyvek sample colours 


Sample 1
Above are four samples of Tyvek layers molded by playing the heat gun over them creating interesting surface textures and profiles.  Tempting though it is to try and speed up the process it's not a good idea to hold the heat gun too close as the Tyvek can become molded on to the kebab stick and become impossible to remove.  Slower is also good for another reason: it's important to consider the effects made by the heat gun: is it time to stop or push distortion even further.  Ensure that the ends are treated.


Sample 2
The above four samples show the addition of threads and beads.  The colour combinations are more subtle and therefore more pleasing.


Sample 3
These three samples show an experimental sequence in the use of adding text.

From the left the first sample uses a strip of an art flyer (advertising the Giacometti exhibition at Sainsbury Centre in Norwich which is now on).  Although I thought the strip was fairly narrow it was too long and the paper too thick for the heat to mold the Tyvek and in so doing change the shape of the paper.
The middle sample uses a small piece of newsprint and here I was concerned about setting fire to it. This did not happen and the hot Tyvek and the newsprint together with the threads are melded into one, though maybe the proportion of newsprint to coloured Tyvek leaves the newsprint too dominant.
The third sample  shows better proportions of newsprint to Tyvek.  I also included some metallic fabric in copper and this has also partially melted.  The threads too -- silk slub and a polyester rainbow thread works well.

I do like the idea behind these samples.  There is something of John Dee, the Elizabethan spymaster, about them, as if some secret code or instructions are wrapped inside and only half revealed.  I could also imagine using pieces of map, a postcode . . .

Incised Toggle Buttons:


Toggle buttons incised with a Soldering Iron


Flat buttons incised with a Soldering Iron

Like some new skills I found using a soldering iron quite tricky.  The design needs  careful forethought as the soldering iron affects the materials instantly.  Some of the buttons I layered with a number of fabrics both man-made and natural, but unlike my heat gun samples I don't feel the effect shows this. Maybe a soldering iron is a tool for very specific work, though much more practice would be needed to answer that question.

Monday, 24 August 2015

Chapter 6 : Simple Tassels


Handmade
Many of activities I've undertaken so far in this module -- decorating paper, hand and machine stitching, even making cords -- have had about them an expressive facet that has been exciting, though if I'm being perfectly honest machine embroidery can still produce unintended results.  I've approached the making of simple tassels with a degree of puzzlement fearing that their creation was more about technique than expression.  I'm really not sure why I bother having this conversation either with myself or in this blog because, as usual, I've begun to see the potential of practising these techniques and seeing the result of countless small decisions.

The descriptions of materials are in anti-clockwise order  from 7 o'clock.


6:1
1.  Baby blue, brown velour and grey denim yarns, the head padded by a 3 cm polystyrene ball and
     wrapped in brown velour, the tie of grey denim yarn. (the tie would be better brown)
2.  Butterfly tuft in natural linen yarn and contrasting storm grey Kidsilk Haze.  The tie of clingfilm
      and silver grey machine embroidery.
3.  A squab in grey velour, Kidsilk Haze and self-dyed silk.  The tie is velour.
4.  Long looped and twisted tassel in ice blue Panama yarn, pale grey crochet yarn and blue-grey silk
     floss.  The twists are silver gilt thread.
5.  Long beaded tassel, the threads as in (4) and caught through a cut silk cocoon coloured with
     metallic rub-ons.  The knotted tie is of clingfilm and metallic thread embroidery.
6.  Small, twisted three-knot tassel, again in the above yarns and tied with silver gilt thread.
7.  Self-dyed two-tone cord threaded through a cut silk cocoon, with the same cord and bead and
     knotted finish.
8.  Grey tape, Petra cotton and sari waste applied in layers and wrapped around a 3 cm polystyrene
     ball.  The tassel is wrapped with a cord made of clingfilm and silver grey embroidery and left
     looking shaggy.  The head is stitched with silver grey detached chain stitch.

It was interesting getting the proportion of head to skirt right and its thickness given that the tassels are not a part of any overall design only samples.  It was also important to limit the number of design features so that the individual tassel did not become too fussy, but just enough to make it balanced and suit the materials used.  For example (8), the first one I made, looked unsatisfactory without the addition of the detached buttonhole stitch on the head.

Ensuring that the yarns/threads covered the polystyrene ball was tricky.  I didn't resort to glue, but if the tassel were being handled regularly this may be the solution.

Little practical matters also came to light:  the wonders of collapsible beading needles used on 5 and the need to wet and then wrap the cords used in (7) tightly with clingfilm after the tassel was complete.  Finally, cutting any of the yarns and threads straight needs practice.

Machine made Tassels

Below from left to right are a Turk's Head Knot and three samples of machine made tassels.

1. Textured tight strip with thick space-dyed machine thread zig-zagged to make a cord.
2. Dark grey and rich brown velour wrapped round a frame and zig-zagged in grey thread.  The made     fabric is wrapped and threaded through with a knotted cord in the same colours.
3. Self-dyed sari ribbon, incorporating cling film and other threads, zi-zagged in Rainy Day space
    dyed thread.  Two lengths of the made fabric are rolled and stitched, then looped through each
    other and trimmed with cling film cord stitched with metallic thread.
4. Self-dyed sari ribbon (this time only two strips) zig-zagged in metallic thread.  Self-dyed cord is
    looped through the ends and left uncut and unstraightened.  The two tassels are trimmed with self-
    dyed gimp and velour and stitched with metallic threads.


6:2


I have learned such a lot through making tassels. Initially I thought they were mainly associated with elaborate interior designs and required a high level of finish.  Of course this is only part of the story.

The experiments in combining colour, texture, thickness, using a range of materials and techniques were endlessly fascinating.  Even using just my colour palette it wasn't always possible to create the subtle effect I wanted, and to add sheen rather than shine to the finished result.

Size and proportion were important too and  for this its useful to imagine the role and function served by the tassels.  In this regard I was interested to find how stiff the made fabric became when as many as six wrappings of sari waste were wound round the frame as in the pale blue tassel, a problem I exacerbated by then rolling and stitching the fabric.  I'd chosen to do this as the fabric was too wide and out of proportion to the length.  By reducing the sari waste in the brown double tassel the band is soft and flexible and narrower.  The tassel in the pale blue version is far too stumpy.  So much to get right!


Tuesday, 18 August 2015

Chapter 5 : Cord Making

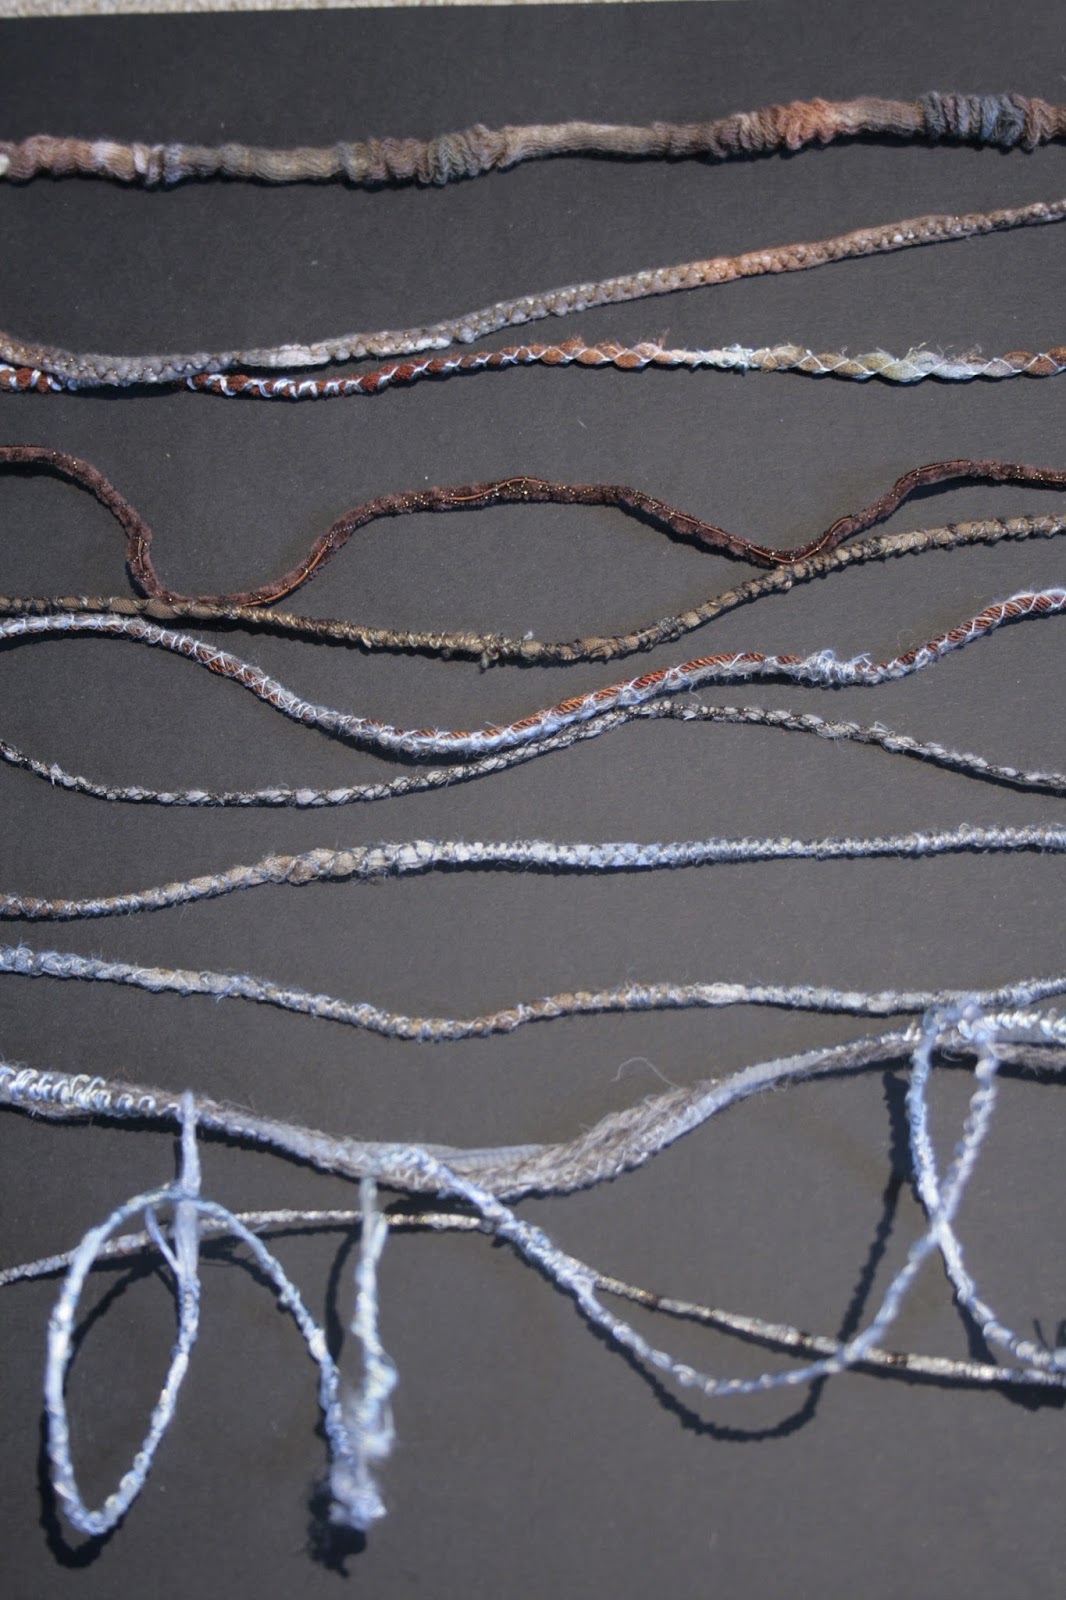
I have just loved making cords! Although I don't play the piano I imagine it's akin to playing scales. I've amassed a wonderful collection of yarns and thread: there's the thick, the thin, the matte, the shiny, the man-made and the synthetic, all in my colour scheme (some self-dyed).  There's cling-film and wire, strips of fabric, ribbon and raffia.  What to choose and combine.  Which thread on the top bobbin, which below -- the adjusting of tension and the cording foot.  Perhaps the joyeousness comes from worrying less about machine control which caused me so much concern in Chapter 4.

Machine Stitched Cords


5:1


1.    Tubular yarn (self-dyed), stuffed with knitting yarn and ruched by pushing together at intervals.
2.    As above, the tubular yarn stiffed and zig-zagged with matte and shiny bronze thread.
3.    Sari waste (self-dyed) and zig-zagged with fine and multi thread silk in ice-blue.
4.    Gimp (self-dyed) and velour yarn zig-zagged with matte and shiny bronze thread.
5.    Torn strip of fabric (self-dyed) and zig-zagged with fine and thick self-dyed) thread.
6.     Silk slub and cords (hand-dyed) with thick grey crochet thread.
7.     Herdwick wool zig-zagged with shiny bronze thread.
8/9. Another shade of sari waste (hand-dyed) zig-zagged with two thicknesses of grey silk.
10.  Grey tubular yarn and several strands of Herdwick wool zig-zagged in surges with fine thread  
       and thick silk.
11.  Cling film zig-zagged in surges with shiny and matte bronze thread.
12.  Cling film and wire zig-zagged in surges with thick and thin ice-blue silk.

Even within such a controlled palette the range of effects is considerable, and these are only a selection of the cords I've made.  It's fascinating to see the effect made by contrasting colour or texture or limiting the materials by one quality.

I've possibly drawn attention too often to the fact that certain threads and yarns are self-dyed, but I have been very taken by the subtlety of colour that's possible, especially the creation of space-dyed effects and the luminosity it's sometimes possible to achieve.  It's quite addictive!  The record of the materials I've used is also useful.

Finally, I've found the way in which yarns are manipulated when stitched in this way, creating thick and thin, flattened and bunched, even split areas throughout their length, interesting.  The insertion of wire in the set of threads to be corded also has plenty of possibilities.

Twisted Cords

The range of twisted cords below starts with the most simple -- a collection of  yarns and threads -- to more complex examples which twist existing cords with other materials to create new cords.


5:2

1.   Sari waste (hand-dyed), linen yarn and thick silk thread.
2.   Existing silk zig-zagged and fabric cord and two textures of silk thread.
3.   Herdwick wool and synthetic yarn enhanced with small sequins.
4.   Sequined yarn, as above, and sari waste (hand-dyed).
5.   Silky yarn and synthetic yarn of varying colours and thicknesses.
6.   Silk ribbon and hazy mohair yarn.
7.   Two existing cords: thick strip of tights zig-zagged with thick thread and strip of fabric again
      stitched with thick thread.
8.   Sari wasted (hand-dyed) and synthetic yarn used in (5) above.
9.   Tubular year and bronze zig-zagged cord, ribbon and velour yarn.
10.  Silk strip and existing cord of matte fabric zig-zagged with thick matte thread.

As I've made these twisted cords I've become aware of their additional properties.  The softness, for example of (1) but how the soft yarn can be given more robustness with the addition of Herdwick wool.  How the softness of some synthetic yarns might be appealing to the eye, but would wear poorly.

Two ready made cords twisted together are not only very attractive, having subtlety and interest along their length, but made of the right materials are robust enough to be made into something else and withstand wear.  (7) is such a twisted cord.

I like the properties of (10), the strip of silk with its sheen adding a very lovely quality to the existing rather matte cord.  It had a lovely irregularity about it with the silk more obvious in places.

Knotted, Plaited and Wrapped Methods


5:3

1.   Grey tubing zig-zagged with thick bronze thread with pairs of knots at intervals.
2.   The above cord combined with sari waste (hand-dyed) wired and zig-zagged with bronze glitter
      thread. The two are knotted together at intervals.
3.   Two strips of sari waste (as above) and grey tubing knotted together with half knot.
4.   Gimp (self-dyed) and grey tubing zig-zagged with storm grey silk knotted together with half
      hitch.
5.   Looped braid edge/Pawnee braid using materials in (4).
6.   Plait using brown organza ribbon, velour yarn, cord with stuffed grey tubular yarn as in (3).
7.   Double ridge using cord made with grey tube (3) and brown cord, six strands of brown cord
      knotted round.

These techniques have great potential especially with the addition of wire, for instance (3) would make a lovely bracelet, as would (4) and (5).  The double ridge in (7) would be equally attractive if the cord were wrapped with brown sari waste.  The addition of beads is another possibility... but that's a whole different chapter.


Thursday, 11 June 2015

Reviewing the Situation


Although I've moved on to the next chapter -- cords -- my mind has kept returning to machine stitchery and trying to understand why I'm so frustrated with it.  As I think I've said before I became rather bogged down in the process and lost sight of the effect I was trying to achieve. 

 Looking at my ideas board it's obvious -- a lightness of touch which the couched sample 4:15 most nearly approaches, the enclosure of spaces creating highlights and shadow.  Perhaps I need to return to printing fabric like the paper sample on the board so that the machine stitching is just a way of emphasizing the spirals, rather than creating them.

Ideas Board

Monday, 1 June 2015

Chapter 4 : Machine Stitchery

I've really had to persevere with this, looking back at my Module 2 machine stitching to reconnect with the designs I was able to make then.  I've reread  and covered my machine manual in post it notes and created fragmentary samples.  Through doing these I've very gradually felt more adept, though I can understand why it's suggested that 10,000 hours practice are needed to become good at any skill.

There are so many aspects to consider when machine stitching: good light, relaxed shoulders, smooth movement of the embroidery ring, footwear -- trainers were not a success.

Then there's the innumerable thread and needle combinations, to say nothing of tension, an issue not likely to help those shoulders.

Those delicious colour combinations hovering in my imagination cannot be translated without all of the above being right.  Maybe I forgot to breathe!

 In essence I suppose what I'm saying is that I'm trying to achieve a piece of cloth which looks intended.  I neither expect nor want uniformity in my spirals and whirls, but something fluid and expressive, something nearer to my hand stitching results, which I felt were responsive to the cloth and the markings on it, not sitting on the surface the way many of the samples below are.  And, of course, this brings me neatly back to daily practice and beginning to accumulate those 10,000 hours.

4:5
4:5 above shows simple spiralling swirls.

4:6
4:7

 4:6 and 4;7 show interlocking spirals with a closely matching thread.

4:8
4:8 shows the effect of increasing the top tension whilst using the same interlocking spirals..  The thread this time contrasts with the fabric.

I like the impression of tracery on the above three samples, or maybe it;s a akin to rock art.


4:9

4:10
More samples of tight top tension and very loose lower tension. In sample 4:9 the lower bobbin was filled with metallic thread, the upper a near match for the fabric which emphasizes the glinting marks. In 4:10 the top thread has simply come away -- a pretty effect, but not very stable.

The samples 4:11 - 4:15 illustrate some of the challenges I faced with couching, though they seem to tell a better story than the one I experienced at the time.

The only thread which travelled reasonably happily through the couching foot was the viscose tape (4:13) which the machine stitch caught at intervals creating rounder looking swirls. The sari waste (4:11) and gimp seemed to pull through in a way that created straight lines amongst occasional swirls.  The silk lopi (4:14), whose sheen I liked so much, split for the most part though the sample below worked quite well. The rounder viscose cord (4:15)was quite effective because the machine movements were larger and even when the stitching doesn't catch it acts like an echo of the cord.

4:11

4:12
4:13

4:14
4:15

4:16
And now for text.  This says "at the turning of the stair".  My design ideas are based on spiral staircases and though the use of text appeals I rather think using it is a whole new area of study.  I've been reading "Text in Textile Art" by Sara Impey and it has felt very tempting to go off on another tangent.  Though I can imagine some text spiralling round a tube of some sort, with my current level of skills the text would need to be embroidered on to a straight piece of fabric or soluble stuff.

The final samples below show combinations of spiral stitches in a range of threads.

4:17

4:18
In both 4:17 and 4:18 the thicker threads create a nice 3D surface contrasting with the subtle tracery of the finer threads.  I'm not entirely sure that the two marry well.  It's also interesting to notice the difference using a frame makes. Whilst a frame was used for the central part of 4:18 the final spiral was stitched without one creating puckers and ripples.

All machine stitching has been done on fabric backed by Stitch and Tear.

And what may you ask of velvet? -- a complexity too far, I decided.

Wednesday, 13 May 2015

Repeating Patterns : Computer and Hand Generated, and some explorations

As you'll see from the numbering this is a return to Chapter 2.  I  have taken a square cropped section from two of the computer generated designs and created an all over pattern.   The new shapes and diagonal rhythms in particular I find rather attractive.


2:34

2:35

2:36

2:37

The design below is one of the hand-drawn spirals from Chapter 1 made into a repeating pattern.


2:38
Below are two versions of this idea worked on soluble fabric. 2:39 is worked in dyed sari waste, 2:40 is again worked in sari waste but with the inclusion of velvet circles and some hand stitching. The velvet, which I'd included (against advice) to add depth and richness suffered through the washing process.

2:39

2:40
A further experiment using dyed gimp to create the spirals in 2:38 with narrow velvet inserts was again disappointing.  I had hoped to produce a lace-like fabric, but the thread colour I chose (light grey) dominated.  Definitely a case of trying to run before I can walk!  Couching the spirals on to a fabric is probably a better technique.

Tuesday, 12 May 2015

Chapter 4 : Decorate with Stitchery

There is something about the comfort and pleasure of hand stitching.  Not a new observation, I know, but one I enjoyed recognising at the exhibition "Frayed" in February last year.  I hope that these thoughts will echo again when I listen to a talk next month about John Craske at our local bookshop.

Below then are spirals of pleasure and comfort exploring hand-dyed and bought threads on hand-dyed habotai silk, silk organza and patterned cotton.


4:1
 Running stitch and couched spirals.

 4:2
 A number of stretched springs offset in different thicknesses of thread, including fine metallic which was also used to couch the self-dyed gimp.  The design is a response to the monoprinting beneath.

 4:3
 Ready patterned and hand-dyed cotton were the base for this sample.  This time I used the stair edges as the design motif for the stitching.  What appeared on the fabric was a flowerbed!

4:4
This sample began by exploring spirals created by straight lines using a variety of space-dyed threads.  As the piece evolved -- and it may not be finished yet -- I added couching, fly stitch and wrapped spirals more reminiscent of barbed wire than staircases.